Unity + Neovim setup ft. Nix
Setting up a productive dev environment for Unity projects in Neovim. Bonus - Reproducible with the power of nix.
A tinkerer, oft loves to tinker with new tech & languages. Free and Open Source Software enthusiast, creating Apps, Games, CLI stuff, CI/CD, Automation & a lot more. A revert to Islam trying to seek the pleasure of Allah. I love reading psychology, history of nations and mankind & of course docs.
Getting the nvim-unity plugin
Special thanks to this plugin for allowing this whole thing to work. https://github.com/apyra/nvim-unity.
Thanks to Apyra, this plugin allows the functionality to work in the first place by allowing 3 things that satisfy what Unity and Neovim need to work together.
Nvim Socket compatibility -> This is essential for the Engine functionality to work with Neovim. Which is simply to open a specific file or line you desire to open in nvim. For such integrations, nvim has a handy command to use, which simply listens to the arguments passed to the socket. As an example -
nvim --listen $SOCKET "+$LINE" $FILE"You can even easily pass arguments to cd into a specific directory & open to a certain line. Basically, this means that with this, nvim starts as a server instance, enabling other clients and processes to send commands, in our case, that's Unity!
LSP Ready -> One of the best things Microsoft created is the LSP (Language Server Protocol). This simply allows features like auto-complete, go to definition, in all the beloved code editors we know. The one that we care about is Omnisharp. Now, Omnisharp depends on 2 things, which it needs in order for it to provide you with goodness. A
.csprojand.slnto be in the root folder of our project. However, Unity doesn't generate these by default. This Unity plugin simply allows us to generate these Project Files directly from the Engine! And once this plugin is enabled in the project, it shall automatically generate the project files for you on launch.
Auto-detection * -> It auto-detects Neovim present on your system, recognising it as a valid "Neovim Code Editor". All tho nothing major, this saves you an extra step for your Unity Project. However, this can have some caveats that are easily fixable depending on your setup, which I will describe later.
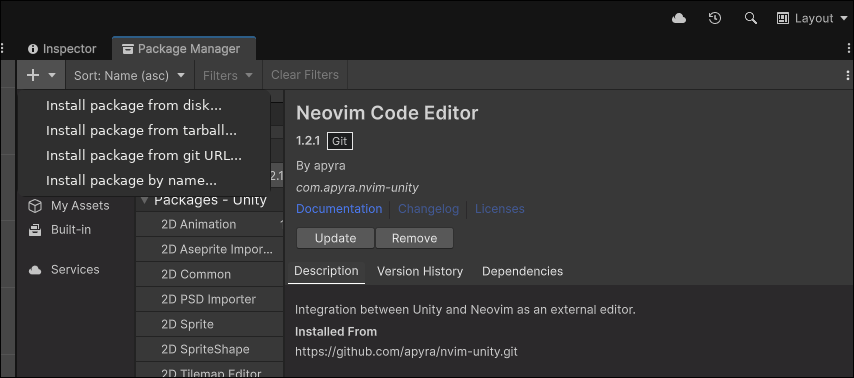
So let's simply install the Unity plugin by going to Window -> Package Management -> Package Manager and from the top left + icon choosing Install package from git URL... and using the URL -> https://github.com/apyra/nvim-unity.
Download the LSP, Syntax highlighting & Setup nvim.
First, we need the required LSP (Omnisharp) for Neovim; this is pretty straightforward depending on how you manage LSPs on your Neovim. I simply use Mason.nvim to install my LSPs. I have my dotfiles here -> https://github.com/Saladin1812/dotfiles. I use the nvchad base configuration. My config/lspconfig.lua ->
require("nvchad.configs.lspconfig").defaults()
local servers = { "html", "cssls", "pyright", "zls", "taplo", "nil_ls", "ols", "omnisharp" }
vim.lsp.enable(servers)
Here I have added omnisharp for the LSP.
Now, to configure syntax highlighting I simply use nvim-treesitter. Here in my plugins/init.lua ->
{
"nvim-treesitter/nvim-treesitter",
opts = {
ensure_installed = {
  "vim",
  "lua",
  "vimdoc",
  "html",
  "css",
  "json",
  "go",
  "python",
  "rust",
  "odin",
  "zig",
  "toml",
  "dart",
  "c_sharp",
        },
  },
},
Here I have simply added c_sharp to make sure I have syntax highlighting.
Now we need a couple of extra extensions to make sure we are good to go. The first is ahmedkhalf/project.nvim required for automatically cd into the project directory. This is important because when nvim with the socket listener is launched, we need it to automatically cd into our Unity project directory with .sln & .csproj at the root. This is required for LSP to work. We can also cd into the project. And launch nvim with the socket listener, but this requires us to manually cd into the project every time we want to work with our project, which is simply not ideal for most all tho mostly I find myself doing it manually either way. Also, keep in mind that sometimes your LSP may attach before project.nvim kicks in. In that case, simply restart your LSP server by doing
:LspRestart. Here in my plugins/init.lua ->{ "ahmedkhalf/project.nvim", lazy = false, config = function() require("project_nvim").setup {} end, },The other plugin we absolutely need is apyra/nvim-unity-sync. This is by the same person who created the Unity nvim plugin. This automatically updates our .csproj file whenever any C# files are created, deleted, or renamed. This also provides a couple of useful commands for manually managing our .csproj. However, for me, I never had to run those commands manually. Here in my plugins/init.lua
{
"apyra/nvim-unity-sync",
lazy = false,
config = function()
require("unity.plugin").setup()
end,
},
Also, it's really beneficial to install Unity Snippets to work with Luasnip. I have created
cs.luafor Unity Snippets here -> https://github.com/Saladin1812/dotfiles/blob/main/.config/nvim/lua/snippets/cs.lua. And I have enabled it in my chadrc.lua ->vim.g.lua_snippets_path = vim.fn.stdpath "config" .. "/lua/snippets"Make sure to use the correct path where you have saved your snippets. As I am using Nvchad, it comes with Luasnip. However, enable the L3MON4D3/LuaSnip plugin if you have to.
Install .NET SDK
Omnisharp does require the .NET SDK to work properly, depending on your Unity version. Currently with Unity 6.2 requires .NET 9 SDK. Download it with your package manager. On nix this is simply -> dotnetCorePackages.dotnet_9.sdk
Launching nvim with the socket listener.
Note: If you are using nix, you don't need to deal with this; simply use the nix file I talk about later.
We are basically all set. However, we need to launch our nvim instance with the socket listener so it can listen to the commands sent by the Unity plugin to our nvim instance. There is a repository by the same developer that includes standalone scripts for launching an nvim instance for your operating system here -> https://github.com/apyra/nvim-unity-standalone. However, on Linux & possibly MacOS, there is a caveat. The script is likely converted from a Windows environment. Due to which you may get errors like
nvimunity: line 2: $'\r': command not found. This is because$'\r'is the Carriage Return (CR) character, which is part of the Windows-style line ending (CRLF). Linux (and the Bash shell) only expects the Line Feed (LF) character as a line ending. The shell is trying to interpret the hidden \r character at the end of each line as part of the command itself, leading to the error. The easiest way is to convert them using thedos2unixutility. Assuming you have thenvimunity.shscript renamednvimunityfrom the standalone repository, simply rundos2unix nvimunityand run the script again usingbash nvimunityor./nvimunitydepending on your default shell. The repository also provides a .desktop file so you can launch it from the GUI. You can edit the .desktop file to use your preferred terminal like so ->exec = "ghostty -e $HOME/.local/bin/nvimunity %f";In this case, the script is in ~/.local/bin/nvimunity. Which I prefer. If it is in /usr/bin, you can also create a symlink. As the script by default uses /usr/bin. Regardless Unity plugin will autodetect
nvimunity. If not, you can simply choose it manually from the External Tools settings in Unity. And it will detect is as a valid Neovim Code Editor. The script itself requiresjq,xdotool'; you can download them from your distro's package manager. In the end, the plugin just cares about finding the valid socket listener. Once you have thenvimunity.shscript running, the socket should be in$HOME/.cache/nvimunity.sock`. This is all that the plugin needs. Voila! Double-clicking on a C# file in Unity should now launch the file in your nvim instance with the LSP and everything working seamlessly.
For NixOS users, I have created a nvimunity.nix that sets up the nvimunity instance without any manual steps, along with the desktop launcher and the nvimunity desktop icon. Here is the script -> https://github.com/Saladin1812/dotfiles/blob/main/nix/home/nvimunity.nix. This also creates a symlink in ~/.local/bin, which can be auto-detected by the Unity plugin, or you can easily choose this path manually. This is helpful because by default on Nix, the packages exist either inside nix stores, or under your per-user profiles, depending on the way you install things example ->
/etc/profiles/per-user/YourUsername/bin/nvimunity.